The problem
I printed an L-bracket to hold a spool of filament on the wall of the shop. It held for a week, then snapped at the inside corner at 3 AM. Classic.
Rather than just printing it thicker, I wanted to know where the stress actually concentrates and whether the layer orientation mattered more than the geometry.
Model setup
- Material: PLA, treated as isotropic (a lie, but a useful one — more on that below). E = 3.5 GPa, yield ≈ 50 MPa for bulk PLA.
- Constraints: fixed at the two mounting holes.
- Load: 25 N downward on the horizontal face — a full 1 kg spool plus a healthy margin for dynamic loading when the printer yanks filament.
- Mesh: 3 mm tetrahedral elements, refined to 1 mm at the inside fillet.
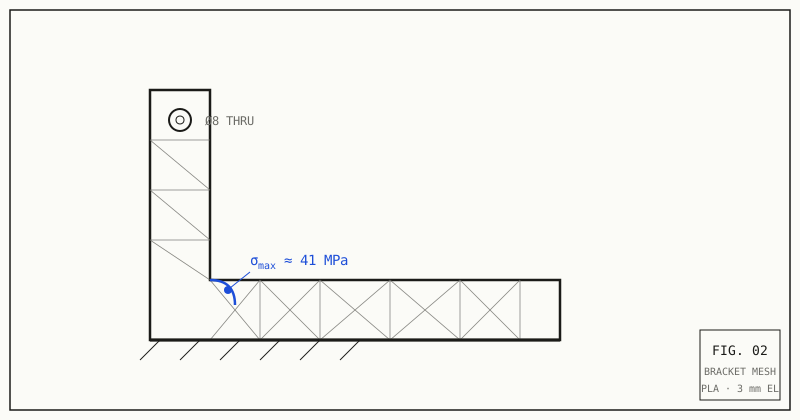 Mesh and stress concentration on the bracket
Results
The static study peaked at 41 MPa at the inside fillet — under bulk PLA's yield, but FDM parts are not bulk material. Between layer lines, the real strength is closer to half that.
I wrote a quick script to estimate the layer-direction knockdown:
bulk_yield = 50        # MPa, datasheet PLA
interlayer = 0.55      # typical z-strength fraction for FDM
effective_yield = bulk_yield * interlayer

sigma_max = 41         # MPa, from the FEA study
fos = effective_yield / sigma_max
print(f"Effective yield: {effective_yield:.0f} MPa")
print(f"Factor of safety at fillet: {fos:.2f}")Effective yield: 28 MPa
Factor of safety at fillet: 0.66A factor of safety below one. The simulation didn't just predict the location — it predicted the failure outright.
The fix
| Change | σ_max | FoS | | --------------- | ------ | ---- | | v1: 1 mm fillet | 41 MPa | 0.66 | | v2: 5 mm fillet | 26 MPa | 1.06 | | v2 + gusset rib | 17 MPa | 1.62 |
The gusset won. It moves load out of the fillet entirely, and it printed flat on the bed with the layer lines running along the stress path instead of across it.
Takeaways
- FEA on FDM is still worth it — the stress field is right even if the material card is optimistic.
- Fillet radius beats wall thickness for corner failures.
- The cheapest simulation is a break test. Print one to fail on purpose; it's 40 g of PLA and tells you things the solver can't.